CIV102 Truss Bridge Design Project

Overview: This project was my first engineering design project that involved creative design with detailed calculations to produce a final product. We were required to use our knowledge on statics acquired to date in our CIV102 course to design a pedestrian truss bridge, 50 metres wide that could handle different specified amounts of load. In addition, we were required to take into consideration cost for steel, and aesthetics. The project requirements can be found here.
Team: Stephen Lau, Amy Miao, Toluwanimi Odemuyiwa
Date: October 5 – October 19
Process in Action: The problem definition was provided already by the assignment guidelines, from where we followed the engineering design process, specifically the following two steps:
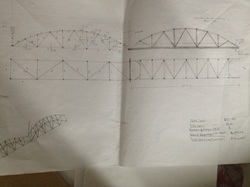
1. Idea Generation: In generating ideas, we prioritized aesthetics, or a “cool” design, to select the general shape of our bridge before entering the detailed design stage. The following are sketches of the various designs during our brainstorming stage. This stage presented a road-block to us as we found it difficult to pick a design that fully met all our requirements. Some designs were discarded as they were too difficult to implement, others were found to waste material, and still others were found to be impossible to perform detailed calculations on using our current knowledge on statics. At the bottom of this page is a slide show of some of the sketches from our idea generation stage.
In the end, we chose the final design pictured in the engineering drawings above. From afar, this design appeared like an arch – a shape we found has been used throughout architecture because of its aesthetics. Up close, however, it was really a modified version of the warren truss we had studied in class and already knew how to calculate. We used no curved hollow steel structures, but rather a series of angled beams to create the arch-like appearance.
2. Detailed Design: After the creative process of idea generation, I experienced the other side of design: calculations. I main responsibility was designing the bottom bracing of the bridge, the guard railing on the side, and the top bracing of the bridge – all of which was designing for wind pressure. This was different from a normal CIV102 problem where we were given a finished truss bridge and required to calculate the forces acting on it using mechanical steps. Instead, I was required to use the calculation steps in class to go backwards and modify the truss structure to minimize cost yet maximize safety. This was essentially my first lesson to trade-offs in design.
- Calculations of my design from wind pressure
- Overall Calculations
